
Image Collections
Curriculum Images
The CALTA21 curriculum includes a pre-selected set of images and links to a carefully chosen set of artworks that we highly recommend using in the classroom. These images are available either as PowerPoint presentations for class discussions or as printable pages for distribution during small group discussions. To access the CALTA21 curriculum and its additional materials, email calta21info@gmail.com with your request.
Creating Your Own Image Collection
If you would like to find your own images to use in the classroom, various museums and art institutions allow users to create their own group of images while browsing the collections online. While the CALTA21 curriculum has a group of images to use with each lesson, instructors are free to select images for lessons on their own and through other resources. Below are some instructions on how to navigate some specific museums’ websites and their image collections, as well as instructions on how to create and save a personalized image group.
The Metropolitan Museum of Art: Creating your ‘My Met’ Account and Image Group
Part 1: Setting Up Your Account
Step 1: Go to the Metropolitan Museum of Art’s website at http://www.metmuseum.org. On the top right of the screen, find and click on the small box that says ‘MyMET Sign In/Register. This box will expand and allow you to click the ‘Register’ button, now on the left of the screen. *Note: You can register and use this account for free, whether or not you are a member of the Met museum.

Step 2: You have the option to watch the instructive video, or just scroll down and begin creating your account, using either your personal or institutional e-mail address. Fill out the required information and click ‘Register’.
Step 3: Once you are registered, you will be redirected to your own currently empty image collection and you can now begin browsing the image bank and collecting images for your classes.
Part 2: Building Your Image Collection
Step 1: Begin by creating a set of images. You can make a separate set for each lesson, each unit, or however else you might choose to divide the images. Click the ‘Create Set’ button on the left hand side of the screen. You will be prompted to enter a Title and Notes for the set, which are both helpful for organizational purposes. For example, you could title your first group “Unit 1 Lesson 1” and write “Three portraits for the students’ first VTS discussion”.
Step 2: Once you have created your set, you can begin browsing the Met Collection. To do this, look up to the webpage header and move your cursor over the ‘Collections’ tab. Select ‘Search the Collection’ in the dropdown menu.
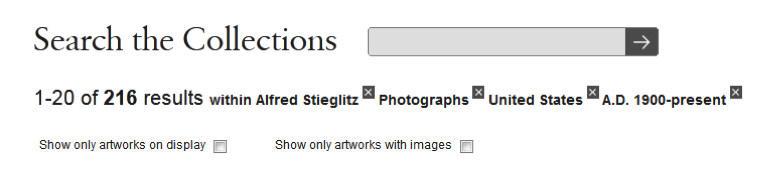
The new page will have a box for browsing the museums archives. You have the options to begin browsing by artist, medium, location and date, as well as museum department. Start wherever you would like. If you select ‘what’ and choose to search for photographs, you will be redirected to a page for all of the photographs. You can continue to narrow down your results further by selecting date, artist etc. Keep in mind that when you would like to begin an entirely new search, you must hit the small ‘x’ on the corner of each of the categories you have already selected to open up the search again (See image below).
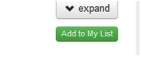
Step 3: Once you have found an image you would like to use, you can save it in your sets. Click on the selected image and you will be able to see detailed information and a larger sized image. To the right of the large image, click the ‘Add to MyMET’ button and the image will automatically be saved in your account.
Step 4: Once you have selected images you would like to use, begin by organizing them. Return to your MyMET page by clicking the box on the top right that you used to register. Once redirected to your account, you can move your cursor over the images and you will be prompted to add the images to your specific sets. Organize as you wish.
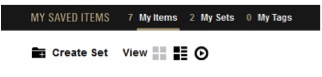
Step 5: You are all set up! Feel free to play around with the viewing options next to the ‘Create a Set’ button or click on the title of the images to enlarge them and see more information. You can easily add or delete images at any time.
The Smithsonian Institution Collections Search Center
The Smithsonian does not require you to make an account. Instead each time you can visit the database at http://collections.si.edu/search/index.htm and build a list of images without logging in. Here, you can e-mail yourself the collection you created for later access.
Step 1: After going to the web address listed above, you can begin searching/browsing immediately. If you have an idea of a work or artist you would like to use, enter the name or keywords in the blue search box. Otherwise, go to the top menu and click the ‘Browse’ button.
Step 2: If browsing, use the alphabetical list to search for different mediums and categories. Once you select the medium, you will be directed to a page with a list of images and a side menu that allows you to narrow down your search (categories include type, culture, language, place etc.). Use these categories to browse more specific subject matter. When you find a work of art that you would like to use or mark down for your lesson, click on the green ‘Add to My List’ button on the right side of the screen (there will be one of these buttons next to each of the items archived in the Smithsonian database. *Note: Since the database includes many resources besides images, you may first want to go to the side menu, click on the button that says ‘online media’ and select ‘images’ when you begin to refine your search.
Step 3: Once you add an image, a box will come up and you will be prompted to create a new list. Title your list and the image previously selected will be added to it. As you continue to select images, this box will give you the option to create another list, so you can organize your images accordingly. If you need to expand your browsing criteria again, you can go to the top menu (as shown below) and place your mouse over the criteria you would like to eliminate. An ‘x’ will appear.

Step 4: After having built a complete list, you can email yourself the list, allowing you to use it in the classroom. To do this, click on the ‘My List’ button in the far top-right of the screen. Select your list. In the new page, you can click on the blue ‘Share’ button. You are given the option to use Facebook, Twitter or your e-mail account to share the list, so select what you would like to use (e-mail recommended).
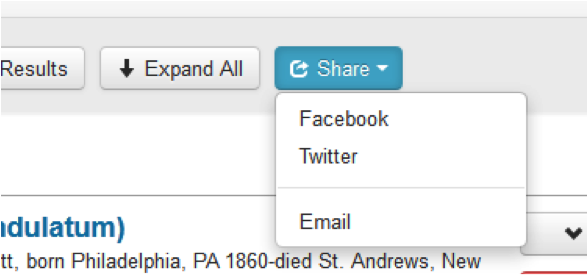
A message will be created with the link to your list, which you can send to yourself (or, if you would like, your students as well). You can use the link in this e-mail to access the list you have created at any time.
The Museum of Modern Art
Part 1: Setting Up Your Account
Step 1: Visit: https://www.moma.org/ and click on the ‘Log In’ button on the top right of the homepage. You will be prompted to either log in with existing information or create a new account. Enter your information and then log in/register.
Step 2: You will be sent an e-mail with a link which is required to activate your account. Once you have registered, visit your e-mail and click on the link sent by MoMA. This will redirect you to the homepage and you will automatically be logged in.
Part 2: Building Your Image Collection
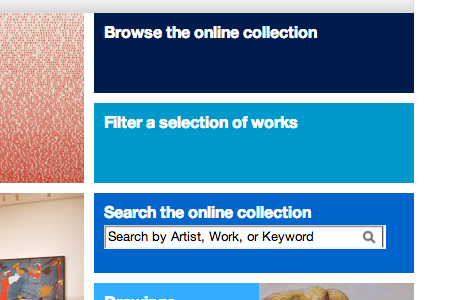
Step 1: To begin building up your collection, move your cursor to the ‘Explore’ tab and select ‘Collections’. The new screen will display the different departments and the upper right hand corner of the page will give you the option to browse the collection, filter search results or type in a keyword for searching (as shown below). Use whichever you prefer.
Step 2: Once you have selected a work of art that you would like to add to your collection, open up its page and click the small orange ‘Save” button in the corner. Once you have saved the image, this button will appear as ‘Remove’ telling you it is saved and giving you the option to remove it, if you would no longer like to have it as a part of your collection.
Step 3: To view your collection, go to the upper right of your screen, where you will find a box that says ‘Hi, [your name]’ and select ‘My Collection’. You will be directed to a page displaying all the images you have saved. You will also be given the option to create sets. If you would like to do this, select the ‘Create Set’ button. You will then be prompted to enter a Title and Notes for the set, which are both helpful for organizational purposes. For example, you could title your first group “Unit 1 Lesson 1” and write “Three portraits for the students’ first VTS discussion”. You can also select a thumbnail of one of the works to represent your set, using option on the top right of the page. To organize your preselected works simply drag them from the ‘My works’ section to the part above, to add them to the newly created set.
Step 4: Now that you have a collection, continue to create and build sets of work. You can easily add and delete images at any time, and use the website and your collection to project images for the class.
GENERAL VTS DISCUSSION IMAGE GUIDELINES:
We suggest using images with a narrative and detailed scenery or background. While selecting images, keep the specific theme of the unit in mind, as well as the overall theme of the curriculum. The theme of the curriculum is “Identity and Portraiture” so any image that relates to this theme fits in particularly well with the other activities and discussions. Since Unit 2 discusses neighborhoods, you could, for example, try to find an image that portrays an a person interacting with an outdoor scene in an urban or rural context.Also, feel free to introduce a more abstract image if you wish, to see how the students discuss it and whether or not they find it interesting.
Also, keep in mind that many of these websites will show all the information of the work alongside it. If you would like to isolate the image so the students do not see the contextual information (as it often influences their responses), simply download it or copy and paste it into a PowerPoint presentation, or however else you choose to display it.
OTHER RECOMMENDED MUSEUM/ARTS INSTITUTIONS WEBSITES THAT ALLOW YOU TO BUILD YOUR OWN COLLECTION:
Google Art Project gives you access to a large amount of work, as it contains the collections of many museums within its website. This is a particularly helpful and expansive source to use for searching and collecting images.